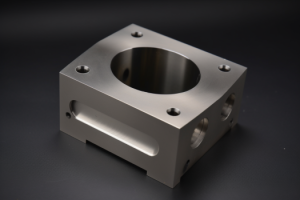
Designing for CNC machining isn’t just about geometry—it’s about minimizing cost without compromising precision. With decades of experience manufacturing tight-tolerance parts for aerospace enclosures, audio faceplates, and medical housings, small design adjustments can dramatically improve both performance and price.
These seven design strategies reduce tight-tolerance machining costs by 40-70%. Strategic tolerance placement, smart material selection, and geometry optimization achieve the same functional performance at lower cost. Moving from ±0.0005″ to ±0.005″ tolerances can cut costs by 300-500%.
Learn which features need precision, how wall thickness impacts tolerances, and when standard finishes match custom ones—backed by real CNC cost data.
Table of Contents
Keep Precision Where It Matters
Strategic tolerance allocation can reduce machining costs by 40-60% without affecting part function. Apply ±0.001″ tolerances only to bearing seats, shaft fits, and sealing surfaces. Non-critical features like mounting holes and external surfaces can use standard ±0.005″ tolerances, cutting precision machining time dramatically.
The biggest tolerance mistake we see? Audio equipment designers specifying ±0.001″ on every dimension because “it’s a precision product.” But wobbling control knobs come from loose shaft bores, not tight mounting holes hidden under bezels. We machine the shaft bores to ±0.001″ for smooth operation while the concealed mounting features work perfectly at ±0.005″—saving 60% on machining costs.
Tolerance Selection Guide:
- Rotating shafts/bearings: ±0.001″ (4x cost vs ±0.005″) – Prevents binding and wear
- Static sealing surfaces: ±0.002″ (2x cost vs ±0.005″) – Ensures gasket compression
- Alignment pins/dowels: ±0.003″ (1.5x cost vs ±0.005″) – Maintains part positioning
- Standard mounting holes: ±0.005″ (baseline cost) – Adequate for most fasteners
- Clearance features: ±0.010″ (0.8x cost vs ±0.005″) – Just needs to clear
Here’s the reality check: over-tolerancing creates expensive problems while under-tolerancing creates functional problems. Medical enclosure projects need ±0.001″ gasket sealing surfaces to prevent contamination, but the same precision on cable clearance holes wastes money without improving sterility. Start with ASME Y14.5 general tolerance recommendations (±0.005″) and tighten only when function demands it.
Design Takeaway: Test your tolerance choices by asking “What breaks if this varies by ±0.005″?” If nothing breaks, use the standard tolerance. Reserve tight specs for features that directly affect your product’s core function.
Avoid Complex Geometries and Deep Features
Complex geometries increase tight-tolerance machining costs by 200-400% through multiple setups, specialized tooling, and extended cycle times. Limit pocket depths to 3x their width, use 0.5mm minimum corner radii, and avoid undercuts that require 5-axis machining. Simple geometry changes can cut precision machining time in half.
Quick Geometry Checks for Your Design:
- Pocket depth over 15mm? Split into stepped levels or multiple shallow pockets
- Pocket width under 5mm? Widen to 8mm+ or accept ±0.005″ tolerance instead of ±0.001″
- Internal corners sharp? Add 0.5mm minimum radius—sharp corners need EDM
- Features underneath overhangs? Relocate to accessible surfaces or split the part
The costliest mistake: deep, narrow channels that force long, fragile tooling. Instead of a 20mm deep x 6mm wide pocket, design two 10mm deep pockets connected by a larger channel. The function stays the same but machining cost drops 50%. These dimensional guidelines align with standard 3-axis machining capabilities found in most shops.
Geometry Fixes That Work:
- Replace curved blends → Simple 45° chamfers (faster to machine, Ra 1.6 μm achievable)
- Split complex pockets → Multiple simple rectangular cuts
- Move tight features → Away from thin walls where tools deflect
- Add tool access → Relief cuts for end mill clearance
Already have complex geometry you can’t change? Design the tight-tolerance features in accessible areas and use standard tolerances for hard-to-reach spots. ASME Y14.5 supports this approach by allowing different tolerance zones within the same part.
Design Takeaway: Walk through your part asking “Can a standard end mill reach this feature easily?” If not, either relocate the feature or relax its tolerance requirements.

Choose 6061 Aluminum for Tight Tolerances
6061-T6 aluminum delivers the best balance of machinability and precision for tight-tolerance work, holding ±0.001″ consistently while reducing tool wear 40-60% compared to harder alloys. Choose 6061 for most precision applications unless strength requirements specifically demand 7075 or stainless steel.
Material Decision Framework: First, calculate your actual stress requirements. If your part sees less than 35,000 psi working stress, 6061-T6 (yield strength 40,000 psi) provides adequate safety margin with excellent tolerance capability.
When 6061 Won’t Work:
- Need higher strength? Use 7075 but design ±0.002″ tolerances instead of ±0.001″
- Must use stainless? Switch to 303 free-machining grade, avoid 304 for precision features
- Regulatory requirements? 316L stainless machines better than 304 for medical applications
The difference shows up in surface finish quality: 6061 consistently achieves Ra 0.8-1.6 μm in tight-tolerance areas, while 7075 typically produces Ra 1.6-3.2 μm due to work-hardening during cutting. This affects both dimensional accuracy and sealing performance.
Compromise Strategies When Stuck with Hard Materials:
- Hybrid approach: Use 6061 inserts for precision features, 7075 for structural areas
- Tolerance adjustment: Design ±0.002″ for 7075 parts, ±0.003″ for stainless
- Feature relocation: Put tight-tolerance features on 6061 components in assemblies
Already committed to 7075 or stainless? Focus tight tolerances on non-stressed features like alignment pins and bearing bores. Use standard tolerances on high-stress areas where the material work-hardens most.
Design Takeaway: Start with stress calculations, not material preferences. If 6061 meets your strength requirements, use it for the tolerance advantage. If not, design your tight features around the material’s machining limitations.
Use Standard Finishes on Non-Critical Surfaces
Strategic surface finish specification can reduce machining costs by 25-40% without affecting part performance. Use Ra 3.2 μm standard finish for most surfaces and specify Ra 0.8 μm only for sealing interfaces, bearing surfaces, and critical aesthetic areas. Over-specifying fine finishes on hidden surfaces wastes money without functional benefit.
How to Identify Which Surfaces Need Fine Finishes on Your Part: Walk through your design asking these questions:
- “Does this surface contact a gasket or O-ring?” → Ra 0.8 μm (prevents leak paths)
- “Does this surface slide or rotate against another part?” → Ra 1.6 μm (reduces wear)
- “Will customers see/touch this surface?” → Ra 1.6-3.2 μm (quality appearance)
- “Is this surface completely hidden after assembly?” → Ra 6.3+ μm (save money here)
The expensive mistake: clients demanding “premium finish quality” on every surface without understanding cost impact. When pushed back on finish specs, show the math: Ra 0.8 μm on all surfaces doubles machining time, while Ra 0.8 μm only on sealing surfaces achieves the same performance for 40% less cost.
Surface Finish Reality Check:
- Internal ribs and supports: Nobody sees them, Ra 6.3 μm works fine
- Bolt mounting areas: Washers cover the surface, Ra 3.2 μm adequate
- Wire routing channels: Function over form, Ra 6.3 μm sufficient
- Gasket contact areas: Critical for sealing, Ra 0.8 μm required
Remember that surface finish affects tolerance measurement accuracy—trying to verify ±0.001″ dimensions on Ra 6.3 μm surfaces creates measurement uncertainty since surface peaks can mask the true dimension.
Already have over-specified finishes? Negotiate with your client: “We can achieve the same sealing performance with fine finishes only on gasket surfaces, saving 30% on machining costs.” Most agree when presented with cost data.
Design Takeaway: Review your drawing and circle only the surfaces that directly affect function or customer perception. Default everything else to standard Ra 3.2 μm machining finish.

Use Standard Sizes
Designing with standard dimensions reduces machining costs by 15-30% through readily available tooling and simplified programming. Use standard drill sizes, common thread pitches, and metric/imperial round numbers whenever possible. Custom dimensions often require special tooling that increases both cost and lead time.
Step-by-Step Dimension Review for Your Design:
- Check All Holes First:
- 6.3mm → Change to 6.35mm (1/4″ drill, available everywhere)
- 8.7mm → Round to 8.5mm or 9.0mm (standard drill sizes)
- 12.2mm → Use 12.0mm or 12.7mm (1/2″ standard)
- Review Thread Specifications:
- M6x0.75 fine pitch → M6x1.0 coarse (standard tap, faster machining)
- M8x1.0 → M8x1.25 coarse (more common, stronger threads)
- Custom threads → Check if standard ANSI/metric equivalent works
- Examine Pocket and Slot Widths:
- 12.5mm wide pocket → 12.7mm (matches 1/2″ end mill)
- 6.2mm slot → 6.35mm (1/4″ end mill standard)
- 19.8mm feature → 20.0mm (round number, easier programming)
Standard tooling also delivers more consistent tolerances since these sizes get the most use and calibration attention in machine shops. Custom drill sizes often run slightly oversized due to less frequent use and regrinding.
When You Can’t Use Standard Sizes:
- Existing product interface requirements
- Critical clearance fits with purchased components
- Regulatory dimension mandates (medical device standards)
Quick Standard Size Reference:
- Common drill sizes: 3.2, 4.0, 5.0, 6.35, 8.0, 10.0, 12.7mm
- Standard end mills: 6.35, 9.5, 12.7, 19.0, 25.4mm
- Coarse threads: M3x0.5, M4x0.7, M5x0.8, M6x1.0, M8x1.25
The hidden benefit: standard dimensions speed up quoting since shops don’t need to source special tooling or verify availability.
Design Takeaway: Open your drawing and review every dimension asking “Is there a standard size within 0.2mm that works just as well?” Converting 5-10 dimensions typically saves 15-20% on machining quotes.
Maintain 3mm Minimum Wall Thickness
Thin walls deflect during machining, making tight tolerances impossible to achieve regardless of machine precision. Maintain 3mm minimum wall thickness for aluminum parts requiring ±0.001″ tolerances. Thinner walls vibrate under cutting forces, creating dimensional variations that can exceed ±0.005″ even with perfect tooling.
How to Check Wall Thickness on Your Design: Follow this evaluation process on your current part:
- Find Your Tight Tolerance Features First:
- Mark every dimension with ±0.001″ or ±0.002″ tolerance
- Identify holes, surfaces, or features requiring precision
- Measure Supporting Wall Thickness:
- Check wall thickness within 10mm radius of each tight feature
- Look for the thinnest section that supports the feature during machining
- Ignore thick areas far from the precision requirements
- Apply the Reality Check:
- Wall < 1mm: Move the tight feature or accept ±0.010″ tolerance
- Wall 1-2mm: Relax to ±0.005″ tolerance or add support
- Wall 2-3mm: ±0.002″ achievable with good fixturing
- Wall 3mm+: Full ±0.001″ capability possible
The deflection follows basic beam theory—cutting forces create bending moments that increase exponentially as wall thickness decreases. A 1mm aluminum wall deflects roughly 8x more than a 3mm wall under identical cutting loads, explaining why tolerance capability degrades so rapidly.
Immediate Fixes When Walls Are Too Thin:
- Add a boss: Thicken just the area around the tight feature
- Internal ribs: Triangular supports behind thin walls (often overlooked solution)
- Relocate features: Move precision requirements to naturally thicker areas
- Accept reality: Design your function around ±0.005″ instead of ±0.001″
Already have a design with thin walls? Don’t redesign everything—just identify which tight tolerances actually matter for function and focus your thickening efforts there. Medical device projects often find that 80% of their tight specs can move to thicker areas without affecting performance.
Design Takeaway: Walk through your model with calipers, measuring wall thickness near every tight tolerance. If you find thin support areas, either thicken them or relax the tolerance—don’t waste money trying to achieve impossible precision.

Split Complex Parts into Simpler Assemblies
Assembly strategies often achieve the same function as complex single parts while reducing machining costs 30-50% and improving tolerance capability. Consider splitting parts when tight tolerances interact with complex geometry, deep features, or multiple machining setups. Simple parts machine faster and hold tolerances better.
How to Decide if Your Part Should Be Split:
- Count Required Machining Setups:
- Look at your tight tolerance features
- Count how many different orientations needed to machine them all
- If 3+ setups required → strong split candidate
- Measure Feature Separation:
- Find tight tolerance features that don’t directly interact
- If features >50mm apart → consider splitting between them
- If on opposite faces → excellent split opportunity
- Check Access Complexity:
- Identify features requiring deep cuts or special tooling
- If some features need 5-axis while others work on 3-axis → split at this boundary
Where to Make the Split:
- Natural parting lines: Existing mating surfaces or assembly interfaces
- Between unrelated functions: Separate structural from precision features
- At material changes: Where different properties would benefit each section
- Keep related features together: All features that must align stay on one part
Assembly Tolerance Reality Check: Your assembly tolerance will be looser than single-part tolerance, but often this doesn’t matter. Assembly stack typically runs 1.5x individual part tolerances due to joint clearances and geometric stack-up effects. ASME Y14.5 provides good guidance on managing these tolerance chains through proper datum selection and GD&T application.
Split vs. Single Part Trade-off:
- Split benefits: Simpler machining, better individual tolerances, material optimization
- Split costs: Additional assembly, more part numbers, tolerance stack-up
- Rule of thumb: If machining complexity drops significantly, splitting usually wins
Audio faceplate example: splitting precision control mounts (±0.001″) from decorative cutouts (±0.010″) reduces total cost 40% even accounting for assembly time.
Design Takeaway: Sketch your part split into 2-3 simpler pieces. If each piece becomes dramatically easier to machine and your function still works with assembly tolerances, pursue the split design.
Conclusion
Strategic design choices dramatically reduce tight-tolerance machining costs while maintaining performance. Focus precision where it matters, simplify geometry, choose materials wisely, and consider assembly alternatives. These seven tips typically cut machining costs 40-60% without compromising function. Contact us to explore manufacturing solutions tailored to your tight-tolerance component requirements.
Frequently Asked Questions
Often yes. Test this: would ±0.005″ instead of ±0.001″ break your assembly? Most engineers over-specify by 2-3x what’s actually needed. Looser tolerances can cut machining costs in half while maintaining identical performance.
If multiple shops quote high or decline to quote, it’s usually a design issue, not a shop capability problem. Complex geometry, impossible tool access, or unrealistic tolerance combinations are red flags. Simplifying geometry typically saves more money than shopping for quotes.
Anodizing adds 0.0002-0.0005″ thickness, potentially pushing dimensions out of tolerance. Heat treating can cause 0.001-0.003″ distortion. Always machine final dimensions after heat treatment, and mask critical surfaces during anodizing to maintain precision.
Check for ±0.001″ tolerances on non-critical features. Even 2-3 tight specs can double machining costs. Mark only the dimensions that actually affect fit or function for tight control – mounting holes, clearances, and cosmetic features rarely need precision.
Show the cost math: precision on 100% of features costs 3-4x more than precision on critical features only. Most “precision” products use tight tolerances on 10-20% of dimensions. The rest use standard specs that customers never see or measure.
Usually thin walls, deep pockets, or complex geometry causing tool deflection. They’re warning you that achieving your specified tolerances will be expensive or inconsistent. Consider thickening walls, splitting the part, or relaxing tolerances in problematic areas.