Product developers often struggle with brushed finish specifications — unsure when to choose brushing over alternatives or what drives up costs. At Okdor, we’ve finished precision parts for aerospace, medical, and audio clients, and small specification decisions can dramatically impact both quality and budget.
Specify brushed finishes for deburring, surface preparation, or aesthetic enhancement. Target Ra 0.2-10 μm surface roughness, choose appropriate brush types based on material hardness, and define consistent brushing direction. Proper specifications control costs while maintaining quality.
Learn when brushed finishing makes sense for your application, how material choices affect processing costs, and what specifications prevent expensive defects.
Table of Contents
When Does Brushed Finishing Make Sense for My Product?
Brushed finishing is ideal for deburring CNC parts, improving coating adhesion, removing contaminants, and creating directional matte aesthetics. Use when you need Ra 0.2-10 μm surface roughness for coating prep, burr-free edges for safety, or premium texture that hides machining marks.
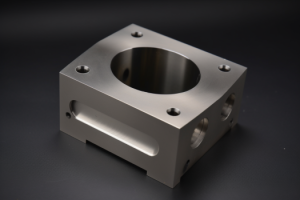
The most common reason we see for brushed finishing is solving the sharp edge problem after CNC machining. Those burrs aren’t just a safety issue during assembly — they create stress concentration points that can lead to part failure. We’ve brushed thousands of aluminum brackets where removing those edges made the difference between passing and failing stress testing.
Surface preparation drives another major use case. When anodizing aluminum housings, the as-machined surface often creates uneven coating thickness. Brushing to Ra 1.6-3.2 μm gives the anodizing something to grab onto, improving adhesion by roughly 40% in our experience. Medical device manufacturers particularly value this because coating failures can compromise sterility requirements under ISO 13485.
For aesthetic applications, brushed finishes hide the small tool marks that are inevitable in CNC machining while creating that premium directional grain pattern. This works especially well on precision instrument housings where you need a professional appearance without the cost of hand polishing. The key is understanding that brushing isn’t just about looks — it’s solving real manufacturing and performance problems.
Design Takeaway: Choose brushed finishing when sharp edges, coating adhesion, or visible tool marks are limiting your product’s performance or manufacturability. For decoration alone, consider whether bead blasting achieves similar aesthetics at lower cost.

Will Brushed Finishes Work on My Material Choice?
Most metals accept brushed finishing, but material hardness determines brush selection and surface quality results. Aluminum alloys like 6061 and 7075 brush easily with nylon or brass brushes, while stainless steel requires steel wire brushes for effective texture development. Softer materials like brass need gentler approaches to prevent gouging.
Material grain structure significantly affects brushed finish quality. We see excellent results on aluminum alloys, particularly 6061-T6, because the consistent grain structure produces uniform texture patterns without work hardening issues. The material responds predictably to brush contact, making it reliable for visible applications where appearance consistency matters.
Stainless steel grades like 304 and 316 require steel wire brushes and controlled pressure to achieve proper texture depth. The harder material resists brush action initially but accepts the finish well once the surface breaks in. Titanium alloys brush successfully but generate heat that requires careful speed management to avoid affecting material properties.
Brass and copper present unique challenges because aggressive brushing creates gouges rather than uniform texture on these softer materials. Nylon abrasive brushes work better here, though processing takes longer to develop the desired surface pattern. Carbon steel brushes well after proper surface preparation removes any scale or oxidation that could interfere with uniform texture development.
Design Takeaway: Verify material compatibility with your CNC shop before finalizing material selection. Some exotic alloys may require specialized brushing techniques or have compatibility limitations that affect your finishing options.
How Durable Are Brushed Finishes for My Application?
Brushed finishes typically last 5-10 years indoors and 2-5 years outdoors, depending on exposure conditions and protective treatments. Surface contact frequency, cleaning chemicals, and environmental factors significantly impact longevity. Proper protective coatings extend service life substantially.
Environmental exposure determines durability more than the brushing process itself. Indoor applications with minimal handling maintain their appearance longest — we’ve seen instrument panels that still look good after 8+ years of normal use. High-contact surfaces like door handles or frequently cleaned equipment show texture softening within 2-3 years as the microscopic peaks wear down.
Outdoor environments accelerate finish degradation through UV exposure, temperature cycling, and moisture penetration into the brushed grain pattern. Architectural panels with proper anodized protection maintain appearance for 8-10 years, while unprotected surfaces begin showing oxidation staining within 18 months of weather exposure.
Chemical cleaning presents another durability challenge. Medical equipment that undergoes frequent alcohol cleaning gradually loses texture definition as the solvents smooth the surface peaks. Marine applications face salt spray that attacks the grain boundaries created by brushing, leading to accelerated corrosion in the textured valleys.
Design Takeaway: Match protective coating selection to your environment and use conditions. High-contact or chemically cleaned applications benefit from sealed protective finishes that preserve the brushed appearance longer.

How Much Will Brushed Finishing Add to My Part Cost?
Brushed finishing typically adds $15-45 per part for small batches, dropping to $3-8 per part in volumes over 100 pieces. Setup time, part complexity, and quality requirements drive cost more than actual brushing time. Simple geometries cost significantly less than parts requiring multiple setups or specialized access.
Setup costs dominate small batch pricing because fixturing and quality verification remain constant regardless of quantity. For a typical housing, actual brushing might take 10 minutes while setup, inspection, and protective handling add another 20 minutes. Production runs spread these fixed costs across multiple pieces, dramatically improving per-part economics.
Part geometry creates the biggest cost variables. Flat surfaces with good brush access process quickly and uniformly, while complex shapes with internal corners or varying wall thicknesses require multiple operations and specialized tooling. We’ve seen accessibility issues triple finishing costs compared to similar parts designed with brush access in mind.
Volume breaks occur around 25-50 pieces where setup costs begin justifying dedicated fixturing. Beyond 100 pieces, automated handling and optimized toolpaths typically reduce costs to the $3-8 range for standard aluminum parts. Rush orders or tight tolerances can add 50-100% premium due to reduced efficiency and increased inspection requirements.
Design Takeaway: Design parts with brush accessibility in mind to minimize setup complexity. Plan finishing costs early in your budget process, as retrofit specifications often cost significantly more than designs optimized for the finishing process.
What Should I Specify for Brushed Finishes?
Include surface roughness targets (Ra 0.2-10 μm), brushing direction requirements, and finish appearance standards on your technical drawings. Specify “consistent directional brush pattern” and reference finish samples when appearance uniformity matters. Avoid detailing process parameters—focus on desired outcomes.
The key specification is surface roughness. For aesthetic applications like instrument faceplates, Ra 1.6-3.2 μm delivers premium matte appearance without excessive processing time. For coating preparation, specify Ra 3.2-6.3 μm to create adequate surface tooth for adhesion.
Direction significantly affects appearance consistency. Simple callouts like “unidirectional brush pattern parallel to longest dimension” prevent operators from changing direction mid-process, which creates patchwork appearance requiring complete rework. Include direction arrows on critical surfaces where grain orientation matters.
Define acceptable appearance using reference samples rather than written descriptions. Terms like “smooth brushed finish” mean different things to different people. Specify “uniform matte texture matching sample A” for appearance-critical applications.
Design Takeaway: Focus specifications on end results rather than process methods. Clear Ra values, direction requirements, and visual references give your CNC shop what they need for consistent results.
How Do I Avoid Brushed Finish Problems?
Design for brush accessibility, select compatible materials early, and plan for proper pre-brushing surface preparation. Most problems stem from geometry preventing uniform brush contact, contaminated surfaces, or incompatible material choices. Prevention costs less than correction.
Accessibility issues create the most expensive problems. Internal corners smaller than brush diameter, deep narrow pockets, or complex curves where brushes can’t maintain consistent contact turn straightforward brushing into expensive hand work or complete redesign.
Surface contamination from machining oils prevents uniform brush engagement, creating streaky, inconsistent texture. Parts with complex internal geometries trap contaminants in areas difficult to clean thoroughly, compounding the problem.
Material selection mistakes often emerge after design commitment. Pure aluminum deforms under normal brush pressure, while tool steels resist texture development entirely. Some stainless grades work-harden during brushing, making successive passes increasingly difficult.
Timing between machining and brushing affects quality significantly. Parts sitting weeks between operations develop oxide films interfering with texture development, while rushing into brushing without proper cleaning creates contamination issues.
Design Takeaway: Build brushing considerations into design reviews from the start. Accessibility and material compatibility questions that seem minor during design become major cost drivers during production.
Conclusion
Brushed finishes work best for deburring, surface preparation, and premium aesthetics when properly specified. Focus on Ra targets, direction consistency, and brush accessibility during design. Avoid over-specifying unnecessary tolerances that increase costs without functional benefit. Contact us to explore brushed finishing solutions tailored to your CNC part requirements.
Frequently Asked Questions
Brushed finishing works well for products needing premium appearance, edge deburring, or surface preparation for coating. Consider it when you want to hide machining marks while maintaining a professional look.
Brushed finishing adds $15-45 per part for prototypes, $3-8 per part in production volumes. Factor this into early budget planning since retrofit specifications cost significantly more.
Aluminum alloys give the best results and value. Stainless steel works but costs more to process. Verify compatibility with your manufacturer before finalizing material selection.
Indoor applications typically maintain appearance for 5-10 years. Outdoor or high-contact products may need protective coating for similar durability, adding to overall cost.
Poor brush access in your design creates expensive hand-work requirements. Parts with internal corners or complex geometries can triple finishing costs compared to accessible designs.