Choosing between wire EDM and CNC machining often comes down to material hardness and geometric complexity. With years of precision machining across aerospace and medical sectors, the decision typically hinges on whether traditional tooling can achieve the required tolerances and reach complex internal features.
Wire EDM becomes the better choice when you need ±0.0001″ tolerances on hardened materials, complex internal features that CNC cannot reach, or when machining pre-hardened tool steels. Wire EDM can maintain tolerances as tight as 0.0001 inches on pre-hardened steel without heat treatment.
Learn the specific scenarios where wire EDM justifies its higher cost, including material thresholds, geometry limitations, and real-world cost comparisons from production runs.
Table of Contents
Can wire EDM machine hardened steel that CNC cannot cut?
Yes, wire EDM can machine hardened steel from 50-65 HRC that destroys CNC tools within minutes. Above 52 HRC, wire EDM becomes the only viable option as CNC tools fail constantly, making costs prohibitive at $300+ per hour.
Most product developers hit this wall with tool steels like D2 or A2. Your CNC shop calls back saying carbide tools are chipping every few minutes. Wire EDM uses electrical sparks rather than physical cutting tools, allowing it to cut the same carbide material that makes CNC tools. We routinely machine D2 at 60 HRC where CNC shops quote $300+ per hour due to constant tool replacement.
A recent mold core project required A2 steel at 58 HRC. CNC shop quoted $2,200 citing “extreme tooling costs.” Wire EDM completed the same part for $680. Wire EDM processes hardened materials without the anneal-machine-reharden cycle that introduces dimensional distortion, eliminating $200-500 in secondary operations.
For AISI tool steel specifications, wire EDM maintains original metallurgical properties without heat-affected zones.
Design Takeaway: If your steel specification shows 50+ HRC, start with wire EDM quotes rather than hoping CNC will work. You’ll avoid failed attempts and often get better pricing than forcing inappropriate CNC tooling.

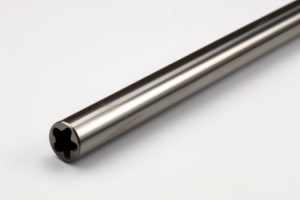
How do I cut slots narrower than 0.5mm in thick metal plates?
Wire EDM cuts slots as narrow as 0.15mm, but add 0.1mm to your design width for wire kerf – a 0.3mm target slot becomes 0.4mm actual width.
The wire diameter determines your minimum slot width, not the other way around. Wire EDM uses wire diameters from 0.1mm to 0.3mm with 0.0001 inch position accuracy, but the cutting kerf adds 0.05-0.1mm to each side. For a 0.4mm target slot, specify 0.3mm on your drawing and note “finished size after wire EDM” to avoid shop confusion. We’ve seen projects fail because engineers designed 0.25mm slots expecting 0.25mm results – impossible with any cutting process.
Thick plates create their own challenges. A 0.3mm slot through 50mm material requires careful wire tension and flushing to prevent a wire bow that widens the bottom of the cut. Stack cutting multiple thin plates often works better than single thick pieces – cutting five 10mm plates simultaneously costs $60 versus $200 for individual cuts. However, minimum wall thickness between parallel slots must be 3x the wire diameter to prevent breakage during cutting.
Drawing specifications matter more than most engineers realize. Clearly mark which dimensions are “before EDM” versus “finished after EDM” to prevent costly shop misunderstandings. Include wire diameter specifications if your application requires specific kerf widths.
Design Takeaway: Add 0.1mm to your target slot width when dimensioning drawings for wire EDM. For multiple narrow slots, check that wall thickness between them exceeds 0.75mm (3x typical wire diameter). Consider stack cutting for quantities over 3 pieces to reduce per-part costs significantly.

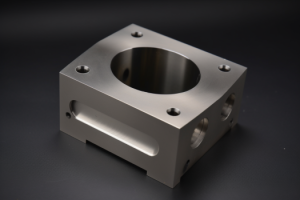
What's the most cost-effective way to machine complex internal cavities?
Wire EDM becomes cost-effective for complex cavities when CNC requires more than 2 setups or custom tooling over $200.
Here’s the reality check most engineers skip: draw lines from each cavity wall to see how a CNC tool would reach it. That complex manifold block you’re designing might need 4 different setups, custom long-reach end mills at $300 each, and multiple work-holding fixtures. We recently quoted a hydraulic valve body where CNC required $1,200 in tooling plus 6 setups at $150 each – total $2,100. Wire EDM completed it in one operation for $850, including the $75 start hole.
The hybrid approach saves money when your cavity has both simple and complex areas. Rough out the basic shape with CNC at $65/hour, then wire EDM only the areas with sharp corners, undercuts, or tight access. This works particularly well for injection mold cavities where 70% is straightforward geometry but 30% requires intricate detail work. Don’t fall into the “all or nothing” trap.
Access requirements drive the decision more than cavity size. A simple rectangular pocket 100mm deep stays with CNC, while a 20mm cavity with multiple undercuts needs wire EDM. The key is geometric complexity, not overall dimensions.
Design Takeaway: Before finalizing your cavity design, sketch the tool access paths for CNC machining. If you count more than 2 setups or need custom tooling over $200, get wire EDM quotes early. Consider hybrid machining to optimize both cost and lead time.
Can wire EDM achieve ±0.002mm tolerances on hardened materials?
Yes, wire EDM achieves ±0.002mm on hardened steel, but multiple finishing passes increase machining time significantly compared to standard tolerances. Use ±0.002mm only when mating parts require gaps under 0.005mm total, or when assembly must fit without adjustment – otherwise ±0.01mm saves substantial time and cost.
Wire EDM can rough cut materials to 0.002 inch tolerance, with trim passes improving accuracy to 0.0002 inch. However, achieving higher precision requires more passes, with both tolerance and surface finish controlled by the number of skims the machine takes. Quick tolerance decision rule: critical mating surfaces get ±0.002mm, functional features get ±0.005mm, non-critical dimensions get ±0.01mm. This approach reduces programming complexity and cycle time substantially.
The tolerance trap hits when your CNC shop declines tight-tolerance work on hardened materials due to tool wear concerns. Wire EDM tolerances of ±0.0002 inch are more widely accepted than the sometimes-quoted ±0.00004 inch, with actual achievability depending on workpiece characteristics and machining time available. This precision level remains consistent regardless of material hardness, unlike conventional machining where harder materials cause rapid accuracy degradation.
Part geometry affects achievable tolerances significantly. Wire bends slightly in a phenomenon known as barreling, and at higher speeds this effect becomes more pronounced. Design rule: sharp internal corners naturally open up 0.001-0.002mm during cutting – specify 0.1mm radius minimums if tight tolerances matter.
For regulated industries, document your actual tolerance requirements through tolerance analysis rather than assuming tighter is always better. Most assemblies function perfectly with ±0.01mm on 80% of features.
Design Takeaway: Apply the 80-10-10 rule – use ±0.01mm on 80% of features, ±0.005mm on 10% of functional features, and ±0.002mm on only 10% of critical mating surfaces. This maintains function while minimizing programming time and finishing passes.
When should I choose wire EDM over CNC machining?
Choose wire EDM when material hardness exceeds 50 HRC, internal corners require radii under 0.2mm, or tolerances below ±0.005mm are needed on hardened materials. Quick decision matrix: Hard material (50+ HRC) = wire EDM required; Complex geometry + soft material = get both quotes; Simple geometry + soft material = CNC first.
Start with your most restrictive requirement using this hierarchy: material hardness first, then geometric complexity, then tolerance requirements. If your part needs D2 steel at 60 HRC, that decision overrides everything else – wire EDM becomes mandatory regardless of geometry simplicity. For mixed requirements, use hybrid machining: rough with CNC, finish complex areas with wire EDM.
Wire EDM costs typically range from $15-100 per hour depending on part complexity and surface finish requirements, while shop rates generally fall between $50-100+ per hour based on tolerance requirements and complexity. Volume breakpoint rule: under 25 pieces, wire EDM often wins due to no setup charges; over 100 pieces, CNC becomes more economical unless geometry or material demands wire EDM.
For highly complex parts, wire EDM is often more efficient overall despite slower material removal rates, particularly when multiple CNC setups and specialized tooling are required. Decision threshold: if CNC needs more than 2 setups or custom tooling over $200, get wire EDM quotes immediately.
Design Takeaway: Use this decision flowchart – Step 1: Check hardness (50+ HRC = wire EDM). Step 2: Count CNC setups needed (3+ setups = wire EDM). Step 3: Evaluate tolerances (±0.005mm on hardened materials = wire EDM). Step 4: Consider volume (under 25 pieces favors wire EDM).

What's the best process for machining thin walls that deflect during CNC?
Wire EDM eliminates cutting forces on thin walls, but add 0.2mm ribs every 10mm first if assembly allows. Thickness thresholds: aluminum under 0.8mm, steel under 1.2mm typically need wire EDM due to deflection.
Critical thickness thresholds: aluminum walls under 0.8mm, steel under 1.2mm, titanium under 1.5mm typically require wire EDM. Length-to-thickness ratios over 15:1 almost always deflect beyond tolerance during CNC cutting. Wire EDM uses electrical sparks rather than physical cutting tools, eliminating mechanical stress that causes part deformation.
The hybrid approach works when your part mixes thick and thin sections. Rough the entire part with CNC leaving 0.5mm stock on thin walls, then wire EDM finish only the deflection-prone areas. This saves money compared to all-wire-EDM while avoiding CNC fixturing complexity.
Future-proofing matters if volumes might grow. Design thin walls to be CNC-compatible from the start using ribs or increased thickness where assembly allows. Don’t optimize purely for current wire EDM needs if you’ll scale beyond 50 parts later.
Design Takeaway: Check if adding 0.3mm to wall thickness or 0.2mm ribs every 10mm keeps you CNC-compatible for future scaling. Document modification options for higher-volume production rather than locking yourself into expensive processes long-term.

Should I use wire EDM or CNC for low-volume production under 50 parts?
Wire EDM costs less under 15 parts due to minimal setup, but design for CNC compatibility if volumes might exceed 100 parts. Break-even point occurs around 25 pieces where setup costs balance per-part savings.
Volume economics: wire EDM wins under 15 pieces due to minimal setup, breaks even around 25 pieces, while CNC becomes 60% cheaper beyond 100 parts. Wire EDM costs typically range from $15-100 per hour depending on part complexity, but includes all setup time. CNC adds $200-500 setup charges that spread better across larger quantities.
Cost justification example: 10-piece order costs $1,800 with wire EDM versus $1,200 with CNC (including setup), but wire EDM delivers faster for urgent prototypes. Wire EDM can run unattended operations, potentially reducing lead times when CNC shops have scheduling backlogs.
The redesign trap catches engineers who optimize purely for prototype volumes. Successful prototypes hit production delays because geometry changes needed for CNC manufacturing require new testing and validation cycles.
Design Takeaway: Use this framework – Step 1: Design for likely production volume (not current prototype quantity). Step 2: If under 15 parts with CNC-compatible geometry, get wire EDM quotes for speed. Step 3: Document modification options early so scaling decisions don’t force complete redesigns.
Conclusion
Wire EDM becomes essential when material hardness, tight tolerances, or complex geometry exceed CNC capabilities. Choose based on your most restrictive requirement – hardness above 50 HRC, tolerances under ±0.005mm, or narrow features typically demand wire EDM. Contact us to explore manufacturing solutions tailored to your precision machining requirements.
Frequently Asked Questions
Design 0.1mm radius minimums for wire EDM applications – sharp corners naturally open up 0.001-0.002mm during cutting. For CNC compatibility, use radii matching your smallest end mill (typically 0.5mm minimum). Avoid specifying “sharp” corners unless functionally critical, as this forces wire EDM selection.
Apply the 80-10-10 rule: use ±0.01mm on 80% of features, ±0.005mm on 10% of functional features, and ±0.002mm on only 10% of critical mating surfaces. This approach maintains part function while minimizing expensive finishing passes and programming complexity.
For most wire EDM parts, ±0.005mm is achievable with standard processes. Tolerances tighter than ±0.002mm require multiple trim passes, significantly increasing cycle time and cost. Reserve ±0.001mm tolerances for critical mating surfaces only – specify ±0.01mm on non-functional features to optimize cost efficiency.
Add 0.2mm support ribs every 10mm length, increase wall thickness to 1.5mm if assembly permits, or split thin sections into multiple thicker parts. Keep length-to-thickness ratios under 15:1 for CNC compatibility. If thin walls are mandatory, design hybrid approaches – thick sections for CNC, thin areas for wire EDM.
Design your target slot width plus 0.1mm kerf allowance – a 0.3mm functional slot should be dimensioned as 0.4mm on drawings. Maintain minimum 0.75mm wall thickness between parallel slots to prevent wire breakage. Note “finished size after wire EDM” on drawings to avoid shop confusion about final dimensions.
Design for CNC compatibility first, then use wire EDM for current low volumes if needed. Add ribs or increase wall thickness where assembly allows to keep future CNC options open. This prevents costly redesigns when volumes scale beyond 100 parts where CNC becomes more economical.